Thursday, October 27, 2011

Apple Cinnamon Muffins

SUPER healthy, SUPER yummy!!

This is a GREAT recipe that I will use many, many times for years to come. I love recipes that replace oil with applesauce without losing moisture or flavor, and this is definitely one of those. If you don't want ANY sugar in them, leave off the streusel topping, but I was feeling naughty... and with only 2 Tbsp of brown sugar in the entire recipe, SO worth it!


Ingredients
1 1/2 cup white, whole wheat flour
3/4 cup Stevia in the Raw
1/2 teaspoon salt
2 teaspoons baking powder
2 teaspoons ground cinnamon
2/3 cup unsweetened applesauce (I use organic)
2 eggs lightly beaten
1/2 cup milk (I used buttermilk – YUM!)
4 apples – peeled, cored and chopped

Streusel Topping
1 cup uncooked regular oats
2 Tablespoons light brown sugar
1 teaspoon cinnamon
1 Tablespoon butter, melted

Directions
Preheat oven to 375. Spray a 12 cup muffin pan or liners with baking spray. In a large bowl, whisk together the flour, Stevia, salt, baking powder, and cinnamon. In a separate bowl, mix applesauce, egg and milk. Stir the wet mixture into the flour mixture by hand until just blended. Fold in the apples. Spoon the dough into the prepared muffin cups.

In a small bowl, mix the oats, brown sugar, cinnamon and melted butter. Spread evenly over the muffin batter. Bake for 25 minutes or until a toothpick inserted in the center of a muffin comes out clean. 


Adapted from All Recipes

Sunday, October 23, 2011

Best Pot Roast EVER - A Joey Approved Recipe

So, I cannot take much credit for this recipe. Very rarely do I follow a recipe to a "t", but this one came pretty close. Thank you Pioneer Woman!

For those of you that are familiar with my husband, you know what he eats is very limited. If it was his choice, his entire diet would consist of five things: chicken wings, fried chicken, ice cream, beef (any kind) and beer. However, since I don't want him dropping dead in the next 10 years, I've tried to slowly expand his pallet to include the occasional vegetable. This is, a most definitely, Joey-Approved Recipe :)

Below is her recipe, and in bold are my changes. Enjoy!

Ingredients 
1 whole Chuck Roast (She says to use 4-5 pounds minimum, but I used 3 pounds, which would NICELY feed 3+ people) 
2 Tablespoons Olive Oil
2 whole Onions
6 whole Carrots (Up To 8 Carrots)
Salt To Taste
Pepper To Taste
1 cup Red Wine (You Can Use Beef Broth Instead, but I used wine)
2 cups To 3 Cups Beef Stock (I didn't have any, so I used chicken stock!)
3 sprigs Fresh Thyme, or more to taste (I used dried)
3 sprigs Fresh Rosemary, or more to taste (I used dried)

Instructions
First and foremost, choose a nicely marbled piece of meat.  This will enhance the flavor of your pot roast like nothing else.  Generously salt and pepper your chuck roast. (I did this, and I did this generously. It was not enough. So, salt the heck out of it! And, when you are done, salt it again.)  Heat a large pot or Dutch oven over medium-high heat. Then add 2 to 3 tablespoons of olive oil (or you can do a butter/olive oil split).  Cut two onions in half and cut 6 to 8 carrots into 2-inch slices (you can peel them, but you don’t have to).  When the oil in the pot is very hot (but not smoking), add in the halved onions, browning them on one side and then the other. Remove the onions to a plate.  Throw the carrots into the same very hot pan and toss them around a bit until slightly browned, about a minute or so. If needed, add a bit more olive oil to the very hot pan.  Place the meat in the pan and sear it for about a minute on all sides until it is nice and brown all over.  Remove the roast to a plate.  With the burner still on high, use either red wine to deglaze the pan, scraping the bottom with a whisk to get all of that wonderful flavor up.  When the bottom of the pan is sufficiently deglazed, place the roast back into the pan and add enough beef stock to cover the meat halfway (about 2 to 3 cups depending on the size of the roast).  Add in the onion and the carrots, as well as 3 or 4 sprigs of fresh rosemary and about 3 sprigs of fresh thyme.  Put the lid on, then roast in a 275F oven for 3 hours (for a 3-pound roast).  For a 4 to 5-pound roast, plan on 4 hours.

When you are finished, you will get this yummy deliciousness…


I even separated the beef from the carrots and onions for Joey so he wouldn't be bombarded by too many vegetables at once. It was much appreciated :P

Gavin and Leroy were very sad I wouldn't give them any... It was TOO GOOD to give up! Look at poor, starved Leroy licking his lips!!


*Next time, I'm going to add celery and potatoes. You can also make AMAZING gravy from the remaining drippings. Just add a tiny bit of cornstarch to a tiny bit of drippings, stir, stir, stir until incorporated, then slowly add remaining drippings in a little at a time over low to medium heat. YUM! 

I did not make gravy this time. After draining my drippings using a colander, I poured them into a bowl, covered and placed them in my fridge. After a few hours the fat separated to the top. I scraped it off and saved that yummy stock for future roasts, soups, etc. It keeps great in the freezer and tastes SO MUCH better than the stuff in the can :)

My Favorite Things - October Edition

1. You know how people say when you have a child, you immediately cannot remember what your life was like beforehand? How everything has changed wonderfully, for the better? Well, I agree. However, I would also apply this statement to my recent purchase of the iPhone 4S. I will admit, I didn't "get" why everyone was so gaga over a phone. I'm not one that is super techy, or even cares that much about it really... but, this phone seriously rocks. I can call, text, shop, take pictures, manage my life, etc. If you're current phone plan is up soon, I HIGHLY recommend getting an iPhone. But, if its not, wait because paying $500+ for a phone makes my head hurt. We were lucky to purchase ours when our plan was up, with a few rebates, on sale. Makes this phone even more awesome to me ;)

2. Almost every, single fall Yankee Candle scent. I'm seriously obsessed. They smell SO GOOD! My new favorites are Pumpkin Buttercream, Apple Cider, Autumn Wreath, Spiced Pumpkin & Red Apple Wreath. I'm usually really sensitive to smells. I easily get headaches from the oil burners, certain perfumes, etc. but, Yankee candles always smell super yummy to me without being too strong. YUM!

3. I've been on a cooking, baking, baby food making kick lately. Everyone says how great it is when you make your own baby food - AGREED! Not only is it much healthier for your baby, but SO much cheaper and, in my opinion, SO much easier than leaving your house, getting in your car, driving to the store, buying jars of baby food, going through check-out, then driving back home... There are hundreds of different food processors, baby bullets, baby steamers, baby food mills, but all I use is the Cuisinart Hand Blender and some ice cube trays. Making Macie's food takes less time than making food for Joey and I. I make a few batches of whatever I'd like to make once every few weeks, grind it up a bit with my hand blender, stick it in some ice cube trays, pop them out frozen into Ziploc freezer bags and I'm finished.

4. The Pampered Chef - Anything and Everything. I love their cookie sheets, muffin tins and bread pans, but I REALLY love all of their cookware toolskitchenware.You're going to pay a few $$ more than you would at Bed, Bath & Beyond, but everything lasts for years versus months and works SO much better. Have a party! Get it all for free!

5. Kroger - Mainly for their ever-increasing, kick-butt, organic selection and their $1 beer and wine specials. Self-explanatory! Oh, and I just found this cool link on their website on how to host a wine tasting party. How fun!!

6. Pinterest - If you haven't discovered this lovely website full of awesome ideas, do so. Its a procrastinators dream :)

Wednesday, October 12, 2011

Banana Bread

So, with all the baking, cooking, Macie watching, digi scrapping, attempted cleaning and laundry washing, I've been bad about BLOGGING it all! Last weekend, I made banana bread. This is a recipe I got from my sister. It is SO YUMMY and uses a lot of bananas, which helps cut the fat without cutting the flavor or moisture. This is a MUST TRY for all and a super easy recipe to whip up in just a few minutes.

Gather flour, baking powder (I use aluminum-free), baking soda, sugar or Stevia, vegetable oil, cinnamon, RIPE bananas and an egg.


Mix all the dry ingredients and then all the wet ones. I mix by hand just until everything is incorporated then pour into a sprayed bread pan. SUPER easy!


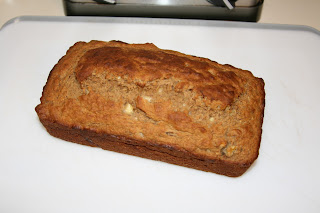
Bake for 40-45 minutes at 350 and then you will get this lovely deliciousness... 


YUM!


Only problem is... I baked this on Sunday and it was gone by Tuesday. Ugh. At least I used whole wheat flour!

Sissy's Banana Bread

1 1/2 cup whole wheat pastry flour (I used white, whole wheat)
1 tsp baking powder
1 tsp baking soda
1 tsp cinnamon (optional)
1/2 cup sugar (I used Stevia)
2 Tbsp vegetable oil
4 medium ripe bananas - mashed
1 egg

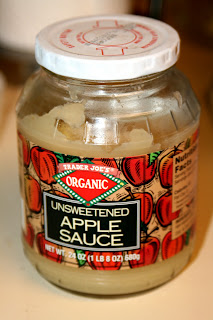
I also added a 1/2 cup of organic, non-sweetened applesauce to the mix. Sometimes recipes can be a bit dry when using Stevia, so I added for extra moisture. This is optional! It would still be yummy without it!


Saturday, October 08, 2011

Saturday...

I spent my Saturday cooking, baking and searching for new yummy recipes. During my search, I found this neat website that lists every "National Day" throughout the year. Happy American Tag Day! ;)

Today I made kapusta soup, banana bread and cinnamon chocolate chip cake. All turned out super yummy! I planned on making blueberry muffins, but ran out of milk, so that is on my agenda for tomorrow or Monday. Tomorrow, we are going to the apple orchard, so I am thinking an apple recipe in the near future! Nothing like fresh apples baked into bread, muffins, cakes, cookies, hmmmmm just about anything.

I've been having so much fun going through all of my recipes, looking for new ones and cooking and baking my heart away the past couple of weeks. I am hoping I won't end the month of October 20 pounds heavier... We shall see ;)

Wednesday, October 05, 2011

Pumpkin Chocolate Chip Muffins

Mmmmmm pumpkin, chocolate chip muffins!

Start with pumpkin and chocolate. I always try to use dark or semi sweet with 60% minimum cocoa.

Then, gather white, whole wheat flour (or whole wheat pastry flour), Stevia, salt, vanilla, baking soda, cinnamon, ginger, cloves and nutmeg.

 Eggs & Butter!


Preheat oven to 325 degrees. Line a muffin pan with paper liners, or spray with baking, non-stick spray. In a large bowl mix flour, baking soda, ground spices and salt. 

In a separate bowl, cream butter and Stevia. I've never baked with Stevia before... when I was mixing it with the butter the consistency looked a bit like popcorn, so I kept mixing... then all was good! Add the eggs, one at a time, beating well after each addition. Beat in the vanilla. Alternately add the flour mixture and the pumpkin puree, in three additions, beginning and ending with the flour mixture. 

Fold in the chocolate chips. Then, take a few from the bag and eat them. Yummmmmm!


Now, after I mixed everything together the dough looked a bit thick to me, so I added a 1/2 cup of applesauce.


 Scoop the dough into 12 muffin liners. Don't be afraid to fill them close to the top, these muffins don't rise very much. Bake for about 20 minutes. Cool and enjoy with a tall glass of milk. SO yummy! :) Next time, I'm going to add a 1/2 cup additional pumpkin instead of the apple sauce to make the muffins more pumpkin-y. I also will add a bit more cinnamon and/or pumpkin pie spice to the recipe - but I can never have too much cinnamon! You do as you wish.


Recipe adapted from Joy of Baking

1 1/2 cups of white, whole wheat flour
1 teaspoon plus a pinch baking soda
1 - 1 1/2 teaspoon ground cinnamon
1/4 teaspoon ground ginger
1/4 teaspoon ground cloves
1/4 teaspoon ground nutmeg
1/2 teaspoon salt
1/2 cup butter, room temperature
1 cup Stevia (or 1 cup sugar)
2 large eggs
1 - 2 teaspoons vanilla extract
1 - 1 1/2 cups canned pumpkin puree (not pumpkin pie filling)
1 cup semisweet (or dark) chocolate chips

Preheat oven to 325 degrees. Line a muffin pan with paper liners, or spray with baking, non-stick spray. In a large bowl mix flour, baking soda, ground spices and salt. In a separate bowl, cream butter and Stevia or sugar. Add the eggs, one at a time, beating well after each addition. Beat in the vanilla. Alternately add the flour mixture and the pumpkin puree, in three additions, beginning and ending with the flour mixture. Fold in the chocolate chips. Bake for 18-22 minutes. Cool on wire rack.


Tuesday, October 04, 2011

Peanut Butter Dark Chocolate Chip Cookies

So, I *thought* I was starting my Bakeathon with some yummy carrot cake cupcakes, but I had my lovely Aunt and Mom over for dinner and my Aunt is not a carrot cake fan (gasp! I know!), so I started the month off with this recipe that I found over at This Chick Cooks. I usually adapt most recipes to make them more nutritional, to use the ingredients I actually have, or to add/omit any ingredient I'm not too fond of. However, this recipe I pretty much followed to a T (except for maybe adding a tad more dark chocolate)! It was super easy to throw together and I had all of the ingredients on hand. These are SO YUMMY (and good for you)! They are pretty rich, so pour yourself a big glass of milk and eat away...

First, you start with peanut butter - I always use natural, organic.

 Then, oatmeal, vanilla, white whole wheat flour, cinnamon, salt, baking soda, an egg and dark chocolate chunks.
 Don't forget the honey...

 And, most importantly, a big glass of wine (this one's for you...)

 Mix all of the dry ingredients & then all of the wet ingredients in a separate bowl (minus the wine - just drink that). Combine both mixtures and hand mix until combined. Get ready to scoop!


 After baking, you get these yummy, delicious cookies! SOOOOOOO GOOD!


Peanut Butter  Dark Chocolate Chip Cookies
Makes 24-36 cookies

3/4 c whole wheat flour (I used white, whole wheat flour)
3/4 c oats  (I pulsed these in a coffee grinder into a fine powder)
1/2 tsp salt
1/2 tsp baking soda
1 tsp cinnamon
1 cup smooth natural peanut butter
1/2 cup honey
1 egg
2 tsp vanilla
3/4 c dark chocolate chips or chunks (I used chunks)

Mix dry ingredients. In a separate bowl mix wet ingredients. Pour the wet stuff into the dry and stir just until combined.

Cool the bowl in the fridge for 20 minutes.

Preheat oven to 350.

Drop level tablespoons of batter onto a cookie sheet lined with parchment or baking mats. These cookies really don't spread so if you want a flatter cookie, simply press the top down a little using a fork and bake for 8-12 minutes. Be careful to watch these. Once they look set they are done. The bottoms will brown quickly when you're cooking with honey.